AD Universal Fk/Ik Setup Tutorial

PRE-RUN

Hi there, thanks for using AD Universal Fk/Ik Match Tool! Here I’m gonna show you how to use the tool. First of all, in order to make it run well you have to ensure that your character rig has the thing that required as on the list below before defining into the tool:

  • Biped character type (currently only biped be able work with the tool).
  • Your character has Fk and Ik setup.
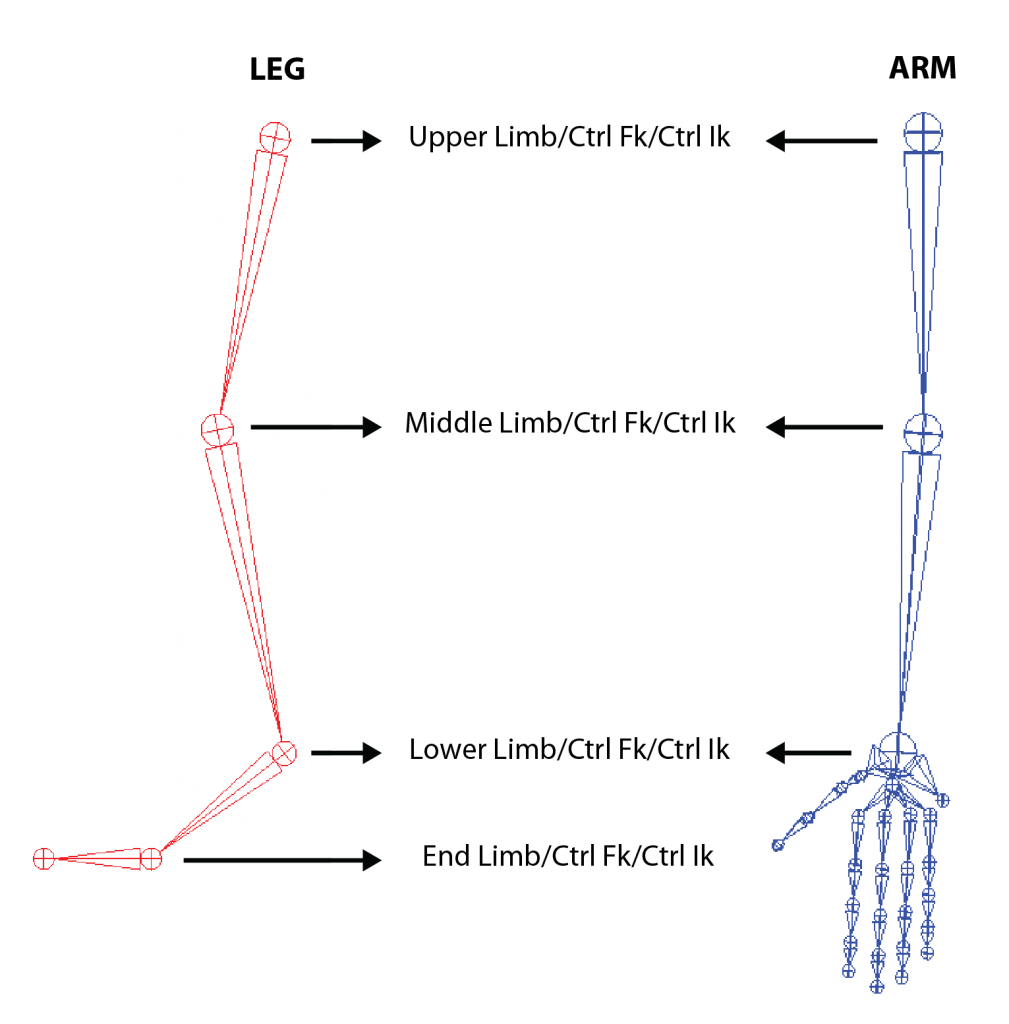
  • Arm has 3 main joints Upper arm, Forearm, Wrist.
  • Leg has 4 main joints Upper leg, Foreleg, Ankle, Ball.

Your Fk setup condition :

  • Every joint Fk (Upper arm, Forearm, Wrist) / (Upper leg, Foreleg, Ankle, Ball) has been connected with a controller respectively.
  • Translate Fk controller can be locked or not.
  • Stretch Fk controller can exist or not.

Your Ik setup condition:

  • Upper arm Ik joint or Upper leg Ik joint can be connected with a controller or not.
  • Forearm Ik joint or Foreleg Ik joint has been connected with pole vector controller.
  • Arm Ik or Leg Ik can be possible and doesn’t have stretch setup.
RUN THE TOOL
  • Before you run the tool, you have to drop the icons in ‘ad_icons’ directory into your Maya icon folder. Normally it creates default in this path :
    C:\Users\Your Name \Documents\maya\version\prefs\icons
  • Drop all the script inside ‘ad_scripts’ directory into your Maya script directory :
    C:\Users\Your Name \Documents\maya\version\scripts
  • You have to load the shelf ‘AdienFkIkMatch’ through clicking the gear icon in the top left corner of Maya to the left of the shelf and choose the load shelf.Browse to the shelf ‘AdienFkIkMatch’ file and load it.

OR

  • You may continue to run this code below in Maya python script editor:
import maya.cmds as mc
ad_fkIk = 'AdienFkIkMatch'
mc.shelfLayout(ad_fkIk, ex=1)
if mc.shelfLayout(ad_fkIk, ex=1):
    mc.deleteUI(ad_fkIk)
mc.shelfLayout(ad_fkIk, p="ShelfLayout")
mc.shelfButton(image="ad_fkik_setup.png", l='Setup Fk and Ik', command="import ad_fkik_setup as st \nreload(st)  \nst.ad_setup_fkik_ui()", olb=(0, 0, 0, 0), olc=(.9, .9, .9))
mc.shelfButton(image="ad_fkik_match.png", l='Match Fk and Ik', command="import ad_fkik_match as mt \nreload(mt)  \nmt.ad_match_fkik_ui()", olb=(0, 0, 0, 0), olc=(.9, .9, .9))
  • After running the script you may find AdienFkIkMatch and it should show two icons. One is for setup, another is for matching the object.
SETUP FK and IK UI
  • Define Objects UI

1. Fill the controller name of your arm Fk/Ik switcher. For example when you will create the setup matching arm so you have to select the arm radio button then define the controller.

2. Otherwise, if you would like to run leg Fk/Ik. So you have to select the leg radio button and define the leg Fk/Ik switcher name.

Define objects map for joint and controller Fk and Ik

3. Select and define the character upper joint.

4. Select and define the character middle joint.

5. Select and define the character lower joint.

6. If you are doing leg part the end joint has to be defined on this setup. Otherwise it can be skipped.

7. Select and define the character upper Fk controller.

8. Select and define the character middle Fk controller.

9. Select and define the character lower Fk controller.

10. If you are doing leg part the end Fk controller has to be defined on this setup. Otherwise it can be skipped.

11. If the character has an upper limb Ik controller so you have to turn on the checkbox and define it. Otherwise it can be skipped.

12. Select and define the pole vector/ elbow controller.

13. Select and define the character lower Ik controller.

14. If you are doing leg parts and the character has an end Ik controller so you have to define it. Otherwise it can be skipped.

15. Clear all inputs in the define object in the box.

  • Additional Setup UI

16. Position that you define right now.

aim axis Y

17. Aim axis to the child, on the image above example that axis aiming to the child with ‘Y‘ axis. This aiming doesn’t matter with a negative or positive axis.

18. Attribute name of Fk/Ik switcher in this case the example name is ‘FkIk’ ; Default value of set to Fk ; Default value of set to Ik

19. You can switch off if the character doesn’t have ‘snapping setup‘ to the elbow or knee. Otherwise you have to define that controller object setup with the attribute name as well as ‘off‘ and ‘on‘ snap attribute value.

20. If you define an Arm setup so this will be deactivated. Otherwise you can choose whether the Leg end Ik (ball Ik) has a controller or not. If the controller exists you may skip this step. Else, you can define the controller that can drive the rotation of the end joint (ball ik). Or if ball Ik doesn’t have both of them (ball Ik controller or ball attribute rotation) you may switch off Ik controller and Ik Ball Toe Wiggle. As in this example, the controller driver name is ‘ankleIk_ctrl‘ and the attribute wiggle name is ‘toeWiggle‘.

21. The wiggle (rotation ball) needs to be defined for its rotation. You may set the reverse on the rotation.

22. If the translated Fk is locked and you need to define the stretch Fk setup you may switch on this button. Normally for Fk stretch setup rely on two parts.

23. Some characters have the limb stretch with translation and the other using scale connection. You can choose which has been connected.

24. The first box is defined for ‘upper limb stretch‘, in this example it’s defined as ‘upperFk_ctrl‘ controller ; the attribute name is ‘stretch‘ and the default value is ‘1‘.

25. The second box is defined for ‘lower limb stretch‘, in this example it’s defined as ‘lowerrFk_ctrl‘ controller ; the attribute name is ‘stretch‘ and the default value is ‘1‘.

  • Additional Attributes Set to Default UI

example of default value of ankle Ik controller

26. In this stage you can add the attribute to make it default as much as you can. The blue button is for adding the group and the red one is for deleting the group from the latest.

27. There are objects that need to be defined, in the example image above, I use Ankle Ik controller as an object ; adding the attribute that has to be defined ; set the value default ; and pick whether fk or ik. The attribute and value of course depend on your character default setup, however, the important thing is the match script will only match with the main joints. So this additional setup will be inserted to the script in order to make default before it’s executed the match position.

28. This is the last step to make all sets. The run button is for creating the setup that you have defined and the delete button is for deleting all previous setup. To clean up the setup you have to select the Fk/Ik Controller that you have assigned (step number 1 or 2) before running.

MATCH FK and IK UI

29. If you want to set the object to be Fk mode, so you can select the Fk/Ik controller that you have assigned (step number 1 or 2) then execute the button.

30. If you want to set the object to be Ik mode, so you can select the Fk/Ik controller that you have assigned (step number 1 or 2) then execute the button.

Show Buttons
Hide Buttons